
Month: September 2022

Read 6 MIN
All you Need to Know about SaaS Platform Development
When was the last time you bought a CD or installed a program using a disk? Like, seriously, take a moment to think about it. Feels like Dark Ages, right?…
October 11, 2024
Read More

Read 5 MIN
Top Apps Every MacBook User Should Have
MacBooks are known for their smooth operation, elegant design, and seamless program integration. However, to achieve high speed, they may slow down over some time, just like any other device…
October 10, 2024
Read More

Read 11 MIN
Calculating Cost for Building a Warehouse Management System
Warehouse Management System (WMS) is very important for any organization since it helps them control their inventory, improve the overall efficiency of operations, and optimize processes. Very often, standard WMS…
October 8, 2024
Read More

Read 9 MIN
How to Hire Remote Developers from India: A Comprehensive Guide
The working environment has been greatly transformed today, especially with the advancement of technology in the twenty-first century. Teleworking, therefore, appears as a decisive model for companies that seek to…
September 24, 2024
Read More

Read 8 MIN
Hiring Node.js Developers is Key to Building Scalable Web Apps
More than ever, scalability has emerged as a focus in today’s ever-changing world of web development. When there are numerous users; it is common to experience traffic where real-time communication…
September 18, 2024
Read More

Read 10 MIN
Cost Comparison: Remote Developers vs. In-House Developers
With the advancement of technology, the management of business teams is also changing as the world turns into a digital platform. Instead of remote work being a trend, it has…
September 17, 2024
Read More

Read 9 MIN
Most Common Mistakes While Hiring Offshore Teams
Hiring offshore teams has gained significant momentum over the past ten years as more businesses seek international talent pools worldwide. The global outsourcing market is projected to be worth about…
September 13, 2024
Read More

Read 8 MIN
12 Common Mistakes Business Owners Should Avoid While Managing Remote Tech Teams
Tech teams work best when they are collaborative, clear about roles and responsibilities, and can easily share data and resources between team members. Maintaining this cooperative spirit can be difficult…
September 11, 2024
Read More

Read 8 MIN
The Role of AI in Modern Web Development
Artificial intelligence is transforming web development due to its learning and prediction capabilities. Web design without AI is a labor-intensive process requiring extensive coding and testing. Today, using AI in…
September 4, 2024
Read More

Read 18 MIN
Key WordPress Developer Skills to Maximize SEO Performance
Search Engine Optimization (SEO) is vital for businesses that drive organic traffic and boost conversions. Building an SEO-optimized WordPress site in today's digital landscape requires more than just basic SEO…
September 1, 2024
Read More

Read 7 MIN
How to use AI integration into your Mobile App?
Mobile App Development has been revolutionized by Artificial Intelligence (AI), to such an extent that applications offer an abundance of new experiences to the user. A few commonly qualified are…
August 23, 2024
Read More

Read 6 MIN
IT Augmentation: Expanding vs. Reducing Your Tech Staffing
That is The Dilemma of Tech Staffing Management. In a tech-driven world, a key decision is whether to expand or reduce your pool of technology professionals. In this challenging…

Read 7 MIN
Building an AI Chatbot? Types, Tech Stacks, and Steps
Introduction Currently, the usage of artificial intelligence chatbots is a necessity for companies to improve customers’ experience, organization, and ultimate satisfaction of the users. Building an AI chatbot can…
August 22, 2024
Read More
Read 7 MIN
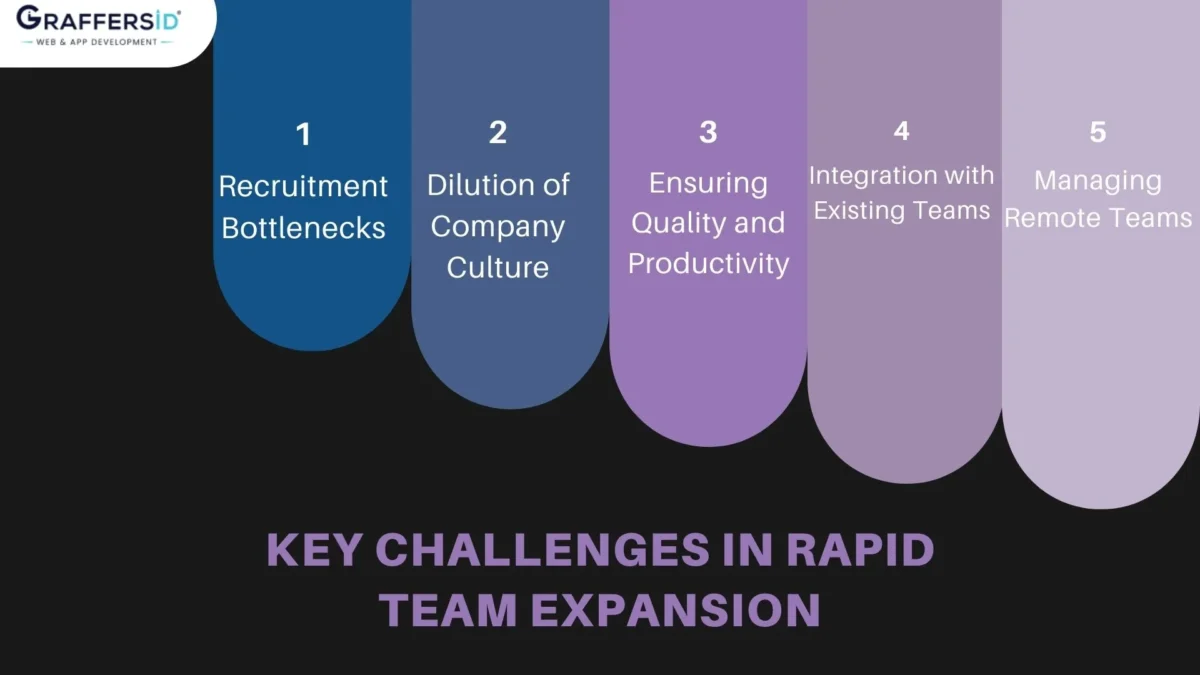
Rapid Team Expansion for Startups: Key Challenges
Introduction Startups require timely workforce augmentation, as it is an inevitable attribute of achieving accelerated growth rates in the business environment. However, as they say, it cannot grow a horse…
August 16, 2024
Read More

Read 6 MIN
Understanding Adaptive Software Development (ASD): A Complete Guide
Traditionalist project management methodologies often fall short of delivering efficient, high-quality products in the dynamic and complex current landscape of software development. Adaptive Software Development comes to the fore with…
August 7, 2024
Read More

Read 8 MIN
Understanding The Threat: Hackers And Weaponized AI
AI Hackers and Weaponized AI pose a fear in the current digital world. This is being made real through how Artificial Intelligence is used to launch harmful cyber attacks. Since…
July 18, 2024
Read More

Read 5 MIN
6 Simple Technologies For Home Healthcare Business Operations
The home healthcare industry continues to face significant challenges with talent shortages and cost accessibility for patients in particular. The shortage of healthcare workers continues to be a major challenge…
July 17, 2024
Read More

Read 9 MIN
Microservices with Node.js and React: Building Modern Web Apps
Besides, with rapidly developing technologies or even new trends, it is critically important to have quality web applications that are as scalable, efficient, and robust as possible. However, what has…
June 25, 2024
Read More

Read 11 MIN
Best Back-End Programming Languages 2024 and Beyond
Continuing along to 2024 and onwards, the need for effective, expandable, and versatile back-end programming languages keeps rising higher than ever. Check out this article for more insight about the…
June 24, 2024
Read More

Read 10 MIN
How to Choose the Right CRM Software for Your Business
We all know that in the 20th century, every business wants to increase their online visibility, and to do this they want to build a website after that the first…
June 14, 2024
Read More

Read 9 MIN
Top AI Code Generators to use in 2024
Imagine having an assistant at your fingertips, capable of translating your ideas into reality with just a few clicks. Technology has made it possible with Artificial Intelligence (AI) and Machine…
June 13, 2024
Read More

Read 15 MIN
AWS vs Azure vs Google Cloud: Which Is better in 2024?
Cloud computing is going viral day by day, due to its ease of use and manageability, but choosing a cloud service provider is a crucial decision for businesses and individuals…
June 12, 2024
Read More

Read 10 MIN
Top 12 IT Outsourcing Companies in 2024
Have you ever felt like finding top-tier IT outsourcing companies is like searching for a unicorn? Seems like almost impossible right? But what if I could tell you that you…
June 7, 2024
Read More

Read 11 MIN
Agile vs Waterfall Methodologies: Differences, Top Frameworks, Pros and Cons
If you are into software development, you must have heard about the two methodologies Agile and Waterfall, and also the importance of selecting the right methodology can significantly impact the…

Read 9 MIN
User-Centric App Development: A Step-by-Step Guide
Creating an app that truly resonates with users is no small feat. It requires a deep understanding of user needs, preferences, and behaviors. This guide will walk you through each…
May 29, 2024
Read More

Read 11 MIN
Top 15 Employee Retention Strategies for Small IT Businesses in USA
In the competitive world of IT talent, keeping your star employees can feel like holding onto flying butterflies. But afraid not, fellow business warriors! Here's the intel you need. This…
May 27, 2024
Read More

Read 5 MIN
How Much Does It Cost to Build an App Like Clubhouse?
Building an app like Clubhouse, the audio-based social networking platform that took the world by storm, involves multiple factors that can significantly influence the overall cost. These factors include the…
May 24, 2024
Read More

Read 7 MIN
10 Signs of Poor Quality in Web Development Services
In 2024 and beyond that, having a high-quality website is crucial for businesses to succeed online. However, not all web development services deliver the same level of quality. Poorly developed…
May 22, 2024
Read More

Read 6 MIN
Resolving Client Communication Mistakes in Your Tech Team
Effective communication is the cornerstone of successful client relationships in any industry, but it holds particular importance in the tech sector. Miscommunications can lead to project delays, misunderstandings, and ultimately,…
May 14, 2024
Read More

Read 16 MIN
TypeScript vs Node.js: Overview, Differences and Performance
JavaScript has become the most popular programming language worldwide because more and more people are working with client-side applications. Due to its variety of technical features and flexible nature, it…
May 8, 2024
Read More

Read 15 MIN
30 Most Popular NPM Packages For Node JS Developers
In the realm of Node.js development, the Node Package Manager (NPM) serves as a goldmine, offering a vast array of packages to streamline and enhance the development process. With thousands…
May 7, 2024
Read More

Read 16 MIN
Freelance vs Full-Time Costs: Which is More Profitable?
So, you're contemplating diving into the world of work, but you're torn between freelancing and committing to a full-time developer to hire for your next project. It's a tough decision,…
May 6, 2024
Read More
Read 17 MIN
Future of Applicant Tracking Systems (ATS) in 2024
In the fast-paced world of recruitment and talent acquisition, Applicant Tracking Systems (ATS) have emerged as indispensable tools for HR professionals and hiring managers. These systems streamline the hiring process,…
May 4, 2024
Read More

Read 31 MIN
WordPress vs React: What Should You Choose in 2024?
The world of web development is constantly evolving, with new technologies and platforms emerging every year. In 2024, two of the most popular options for building websites are likely to…
May 3, 2024
Read More

Read 12 MIN
React.js Vs Elm: Which is Better in 2024?
React.js and Elm are two popular choices among major companies, each with its strengths and weaknesses. As we delve into 2024, let's explore the key aspects of React.js vs Elm…

Read 4 MIN
Salary Trends for Indian Developers in Global Companies
In today's globalized tech industry, Indian developers are playing an increasingly vital role. From software engineering to data analysis, Indian talent is sought after by multinational companies around the world.…
May 2, 2024
Read More

Read 17 MIN
Difference Between Stateful vs Stateless API
In the dynamic realm of web development and application programming, the choice between stateful and stateless APIs is akin to selecting the right tool for a specific job. Understanding the…

Read 24 MIN
SolidJS vs React: Which is Better In 2024?
In today's fast-paced world of web development, choosing the right JavaScript framework can make all the difference in the success of your project. With so many options available, it can…

Read 33 MIN
Java vs JavaScript: What is Differences?
While the two (Java vs. JavaScript) have comparable names, both are two entirely unexpected programming dialects. Java is a full-highlighted, generally useful, programming language that is chiefly utilized on the…
May 1, 2024
Read More

Read 34 MIN
Job vs Business: Which is Better in 2024?
As we enter the new year of 2024, many of us may be thinking about our career paths and considering whether to pursue a traditional job or start our own…

Read 22 MIN
MERN Stack vs Django: Which is Better in 2024?
Nowadays, the most significant user interfaces enhance the user experience and boost traffic to the most widely used websites and online services. If the improper web development stack is chosen…

Read 10 MIN
15 Best Flowchart Software Tools in 2024
Flowcharts have become an indispensable tool for businesses, educators, and individuals alike. They provide a visual representation of processes, helping to streamline workflows, improve communication, and enhance decision-making. In 2024,…
April 25, 2024
Read More

Read 16 MIN
How to Implement Financial Strategies to Optimize Business Expenses
Every dollar saved through strategic financial planning can be reinvested for growth, innovation, or even weathering unexpected challenges. In this comprehensive guide, we delve into actionable financial strategies to optimize…
April 22, 2024
Read More

Read 12 MIN
Bug Severity vs Priority in Testing – Complete Guide
One of the key aspects of bug prioritization is understanding the difference between Bug severity vs priority. While these terms are often used interchangeably, they carry distinct meanings and play…
April 17, 2024
Read More

Read 18 MIN
Top 10 React.js Companies in Finland
As the digital landscape evolves, businesses increasingly turn to robust technologies like React.js to build modern and dynamic web applications. In Finland, known for its vibrant tech scene, several companies…
April 16, 2024
Read More

Read 11 MIN
Top 10 Important KPIs for Software Development
Ready to establish your business goals? We say the key is measuring performance through software development. Did you know that people who write their measurable goals are 33% more likely…
April 10, 2024
Read More

Read 7 MIN
What is POC (Proof Of Concept) in Software Development
Convincing individuals to help with a thought or a task requires more than a sound portion of idealism. Unyielding financial backers request obvious proof that a startup and its strategic…

Read 11 MIN
Top 10 Companies That Use React Native Successfully
React native Companies are creating a ripple in the modern market. Currently, smartphones are becoming a popular platform for people to socialize, contact, or shop. This made way for the…
April 9, 2024
Read More

Read 12 MIN
Most Common Misconceptions About Hiring Remote Developers
Are you considering hiring remote developers but feeling hesitant due to some common myths? In today's interconnected world, remote work has become increasingly prevalent, offering numerous benefits to businesses and…
April 7, 2024
Read More

Read 28 MIN
WebAssembly vs JavaScript: Which Is Better in 2024?
Web development has evolved significantly over the years, and developers now have an array of tools and technologies at their disposal to create powerful and interactive web applications. Two prominent…
April 4, 2024
Read More

Read 15 MIN
Advantages and Disadvantages of Using .NET in 2024
In the world of software development, choosing the right technology stack is a crucial decision that can have a significant impact on the success of a project. One of the…
April 3, 2024
Read More

Read 8 MIN
Top Tools For Cross-Browser Testing (Complete Guide)
Cross-browser testing is a critical aspect of web development, ensuring that websites and web applications function seamlessly across different browsers and devices. With the vast array of browsers available today,…
April 1, 2024
Read More

Read 21 MIN
Golang vs Java – What Should You Choose in 2024?
As we step into 2024, the decision of whether to opt for Golang or stick with Java becomes more critical than ever. This article dives deep into the comparison between…

Read 11 MIN
The Future of Remote Work in 2024
In recent years, remote work has transformed from a niche concept to a mainstream reality. The COVID-19 pandemic accelerated this shift, forcing companies and employees alike to adapt to new…
March 28, 2024
Read More

Read 11 MIN
Ruby on Rails vs JavaScript: Which is Better in 2024?
Welcome to our in-depth exploration of a critical decision many tech leaders face in 2024: choosing between Ruby on Rails and JavaScript for your startup's development stack. In this blog…
March 20, 2024
Read More

Read 13 MIN
Most in Demand Programming Languages in 2024
The world of technology is booming and has become a place shrouded in mystery and exclusivity. The programmers are expected to have the edge over the coding abilities to stand…
March 19, 2024
Read More

Read 13 MIN
How to Build the Best IT Outsourcing Company in the USA?
In today's ever-evolving digital landscape, the importance of IT outsourcing cannot be overstated. From cutting costs to accessing specialized talent, IT outsourcing has become a strategic imperative for businesses across…
March 13, 2024
Read More

Read 21 MIN
Top 25 Trending & Unique App Ideas in 2024
It all comes down to one notion. What makes your tech start-up successful is the evolving vision that underpins it. Undoubtedly, the market for mobile apps is burgeoning, and we…
March 12, 2024
Read More

Read 12 MIN
Benefits and Services of Chatbots
In today's fast-paced digital world, businesses are continually seeking innovative ways to enhance their customer interactions while streamlining their operations. One of the most transformative technologies in recent years is…
March 11, 2024
Read More

Read 13 MIN
Top 12 Edtech Software Development Companies Newyork
Welcome to the epicenter of innovation, where the bustling streets of New York City pave the way for groundbreaking advancements in the realm of education technology. In this blog, we…

Read 27 MIN
Java Full Stack VS MERN Stack: The Complete Guide
Are you a tech enthusiast or a business professional looking to diversify into the tech world? If yes, you better get started with selecting the right development process. This brings…
March 10, 2024
Read More

Read 12 MIN
Hire Remote Developers in Ohio
In today's dynamic tech landscape, the demand for top-tier talent is incessant, driving companies to explore innovative avenues for recruitment. One such transformative approach gaining widespread recognition is the concept…
March 8, 2024
Read More

Read 21 MIN
Data Privacy in the Digital Age: How to Protect Your Information
In the digital age, our lives are increasingly intertwined with technology, and our personal information is constantly being collected and stored by various entities. This data, ranging from our online…
March 7, 2024
Read More

Read 7 MIN
Top 15+ Real Estate Tech Trends 2024
The world of real estate is continuously evolving, driven by technological advancements that revolutionize how we buy, sell, and manage properties. As we step into 2024, the landscape of real…
March 6, 2024
Read More

Read 9 MIN
Pros and Cons of IT Staff Augmentation Companies
In the rapidly evolving world of Information Technology (IT), businesses in the USA are increasingly exploring IT staff augmentation as a strategic solution to address their evolving talent needs. This…
March 5, 2024
Read More

Read 9 MIN
Node js Developer Job Descriptions – Guide, Templates & Interview Questions
In the rapidly evolving landscape of web development, Node.js has emerged as a crucial technology, revolutionizing the way server-side applications are built. As businesses increasingly rely on Node.js for its…

Read 25 MIN
How To Develop an App Like Uber [Cost Estimation]
So, if you are an entrepreneur, who has an idea and wants to Develop An App Like Uber, but is wondering how much will it cost to make an app?.…
March 4, 2024
Read More

Read 16 MIN
Difference Between React and Bootstrap
Choosing a correct front-end framework is a difficult task for front-end developers after the client prerequisites are characterized. The advantages of the innovation and upgrade range of abilities to make…
March 2, 2024
Read More

Read 13 MIN
MERN Stack Developer Job Description: Guide, Templates & Interview Questions
MERN stack, an acronym for MongoDB, Express.js, React, and Node.js, is a robust technology stack widely used for building modern web applications. This guide delves into creating a comprehensive MERN…
March 1, 2024
Read More

Read 7 MIN
Dos and Don’ts of Interviewing Remote Developers
In today's dynamic and interconnected world, the concept of remote work has gained tremendous momentum, especially in the realm of software development. As companies strive to harness global talent and…
February 29, 2024
Read More

Read 6 MIN
Agile Methodologies In Offshore Software Development
The adoption of Agile methodologies has become more than just a trend; it's a necessity for teams striving to deliver high-quality products efficiently. Yet, when it comes to offshore software…
February 26, 2024
Read More

Read 11 MIN
Web Development: The Best Ways to Secure Your Business’s Online Presence
In the digital era, having a strong online presence is vital for any business to thrive and succeed. However, with the ever-increasing number of cyber threats lurking around every corner…
February 25, 2024
Read More

Read 6 MIN
Top Tools For Automate Your Email Outreach
Email outreach remains a powerful strategy for initiating meaningful connections and collaborations. However, manually managing email campaigns can be time-consuming and inefficient. That's where automation tools come into play, helping…
February 21, 2024
Read More

Read 32 MIN
How to Build an App Like Poshmark: A Comprehensive Guide
Poshmark is a very popular online marketplace known for its fashion-forward community and easy-to-use app. If you've ever considered developing your own app similar to Poshmark, you're in the right…
February 20, 2024
Read More

Read 19 MIN
Preact Vs React: What Are The Differences?
The world of web development is constantly evolving, with new tools and libraries emerging regularly. Among the most influential players in the field of JavaScript libraries, React has carved out…
February 18, 2024
Read More

Read 13 MIN
Next.js vs Nuxt.js: What Are The Differences in 2024?
You must have heard a lot of good or bad things about JavaScript frameworks, Next.js and Nuxt.js often find themselves in the spotlight. Both are powerful tools that make building…
February 14, 2024
Read More

Read 12 MIN
Top 13+ Enterprise Software Development Companies In The USA
Looking for the top enterprise software development companies in the USA to partner with for a software development project? We have listed the top 13 companies that are serving the best…
February 12, 2024
Read More

Read 25 MIN
Most Popular Backend Languages in 2024?
When it comes to web development, the backend is something you can not compromise on. That being said, you must start with choosing the right backend framework to ensure a…

Read 8 MIN
8 Key Factors to Consider Before Starting a Small Business
Starting a small business is a heady prospect, with business owners needing to prepare, plan, and make critical decisions about their company. These important decisions shape how your company is…

Read 7 MIN
Outsourcing vs Managed Services: What Are the Differences?
As businesses rely more heavily on technology to operate, it's become increasingly important for them to have access to IT expertise and support. Two common options for businesses looking to…

Read 19 MIN
Nearshore vs Offshore Outsourcing: What to Choose in 2024?
Outsourcing is the practice of hiring a company or individual outside of an organization to perform a specific task or service. It allows businesses to focus on their core competencies…
February 10, 2024
Read More

Read 11 MIN
Where to Outsource Software Development Project
Outsourcing software development projects can be a great way for companies to access skilled technical talent while controlling costs. However, finding the right offshore development partner requires careful research and…

Read 17 MIN
What is AR Zone App: Functions, Features and Availability – GraffersID
AR is revolutionizing the way we interact with technology, and AR Zone is a cutting-edge application that brings this exciting technology right to your fingertips. In this blog, we will…

Read 10 MIN
What Is ChatGPT Enterprise: How It’s Works?
On August 28, 2023, OpenAI made a significant stride in the world of artificial intelligence with the launch of ChatGPT Enterprise. This enterprise-grade version of ChatGPT is poised to revolutionize…
February 7, 2024
Read More

Read 6 MIN
Cost of Building PMS Software
In today's fast-paced business landscape, staying ahead of the curve often means leveraging technology to streamline operations and maximize efficiency. Project Management Software (PMS) has emerged as a critical tool…

Read 12 MIN
Buy Now Pay Later App Development Process & Cost
The Buy Now Pay Later (BNPL) industry has experienced rapid growth in recent years, providing consumers with a flexible and convenient alternative to traditional credit cards. As more people opt…
February 6, 2024
Read More

Read 9 MIN
Hire Remote Developers in Georgia Hourly Basis
In the dynamic landscape of the modern business world, adaptability is the key to success. One avenue that has gained significant traction in recent years is the strategic decision to…

Read 13 MIN
What is Node JS used For?
Node.js is a product development innovation that is utilized by the absolute best parts in worldwide business, to fabricate quick, excellent applications. For developing applications using Node.js, you need to…

Read 10 MIN
PHP vs NodeJS -Which is Better In 2024?
Web development appears to be a diversified and ever-changing field. Every now and then, there is a technology, trend, or tool, due to which developers experience the dilemma. Developers often…

Read 10 MIN
Everything You Need to Know About Offshore Development Centre
Whether it is London San Francisco, Berlin New York, or any other major city, hiring a software developer can burn a hole in your pocket. Apart from eye-watering salary, the…

Read 13 MIN
Guide to Develop a Dating App Like Tinder
Today in the tech-evolving world, relationships all over the world started to begin on an online dating applications. According to recent stats, around under 30 age about 53% percent of…
February 5, 2024
Read More

Read 27 MIN
Hire Offshore Developer – Overseas Programmer For Startups
Offshore is all over the place! The expression offshore software development appears to have acquired a foothold with time all over the world. Onshore and offshore are fundamentally cut out…

Read 11 MIN
Express JS vs Node JS: What Are The Differences?
Over the years, Node.js and Express have become two of the top backend technologies for creating online applications. Both of them cater to various backend functions, and their comprehensive services…

Read 8 MIN
Navigating the Custom Software Development Process
Making your way through the intricate world of custom software development is like setting out on a strategic mission. This process consists of several clearly defined processes, each essential to…

Read 14 MIN
GitLab vs GitHub: Which Platform is Better For Your Project?
In the realm of software development, version control systems play a pivotal role in ensuring efficient collaboration, seamless code management, and effective project tracking. Two of the most popular and…

Read 11 MIN
Golang vs NodeJS: Which is Better in 2024?
So you are also confused between Golang and NodeJS: which is better and what should you choose for software development? Don’t worry as a leading web and app development company…
February 3, 2024
Read More

Read 9 MIN
How Much Does It Cost To Hire Laravel Developer?
When it comes to creating highly interactive, dynamic websites, PHP is a popular programing language choice. And, like any other computer language, PHP offers a number of frameworks to assist…

Read 17 MIN
How to Make An App like Airbnb: Here is a Detailed Guide
Do you also have a Home-Away-from-Home idea and looking to get a replica of a giant in the industry-Airbnb? If yes, then you just need to spend 8 minutes to…

Read 8 MIN
Jira vs Airtable: Which Is Better Project Management Tool in 2024?
As we step into the year 2024, the realm of project management tools continues to evolve, offering a plethora of options tailored to diverse needs. In this era of heightened…
February 2, 2024
Read More

Read 16 MIN
AngularJS vs React JS: Which is better in 2024?
The use of JavaScript tools is increasing nowadays; it is daunting to pick the appropriate technology stack for mobile app development at a time. Let us discuss the two emerging…

Read 9 MIN
How To Develop Web Application Using Ruby on Rails
Ruby on Rails, also known as RoR or simply Rails, is an open-source structure for Web development in Ruby, a thing object-oriented programming (OOP) language like Perl and Python. Ruby…
February 1, 2024
Read More

Read 10 MIN
Advantages and Disadvantages of Outsourcing
Outsourcing has become a fundamental component of modern business practices, enabling web & app development companies to tap into specialized skills, reduce costs, and focus on their core competencies. However,…

Read 19 MIN
Flutter vs Angular: What Should You Choose in 2024?
If you’re a startup that has a fair share of a digitized business and wants to develop a mobile app. But confused about choosing Flutter vs Angular for app development,…

Read 10 MIN
How to Create a Fitness App That Thrives in the Market
We are currently witnessing a trend for a healthy lifestyle. Even when gyms are shut down and people are asked to stay at home to prevent the spread of coronavirus,…
January 24, 2024
Read More

Read 10 MIN
Cost to Hire MERN Stack Developers
Innovation is one of the substantial parts of technology, and it's constantly evolving and touching the sky daily. The primary justification for the revisions is that users are not happy…
January 19, 2024
Read More

Read 8 MIN
Most Common Mistake While Finding the Staff Augmentation Company
In the dynamic landscape of business expansion and technology-driven ventures, the pursuit of the right talent is a perpetual challenge. For CEOs, CTOs, hiring managers, project managers, and startup founders,…

Read 8 MIN
What Features a Fitness App Must-Have?
The global spread of the coronavirus has taken a major hit on the fashion industry and tumbled many stocks, however, one sector that is sustaining growth during the crisis is…
January 17, 2024
Read More

Read 11 MIN
How to Create a Scalable Peer-to-Peer Marketplace Software In 2024?
The E-commerce/peer-to-peer marketplace is growing with an average rate of 17-18% annually. People are opting to buy online over getting stuck in traffic to hit the store in person, which…

Read 15 MIN
Build a Mobile App Using React Native From Scratch
The upheaval, or say, the breakthrough from the past, has created a pressing need for a shift from business models with real-life approaches to digital platforms with a technological approach…
January 16, 2024
Read More

Read 9 MIN
How To Create An App For The iPhone in 2024
At first, you will think it is a silly question. There are a plethora of online tutorials and how-to guides that provide you with app development insights. Then, what is…

Read 13 MIN
React JS vs Ember JS: What are the Difference Between?
When it comes to app development, we bet the first thing that comes to your mind is using JavaScript tools. Effectiveness and integrity, along with better functionality, are some of…

Read 24 MIN
Top 10 Progressive Web Apps Examples in 2024
Planning to build a highly engaging mobile app? How about adding some website features to it? Progressive web applications are something in between the website and mobile applications. They leverage…
January 15, 2024
Read More

Read 10 MIN
Cost of Building Law Firm Website
In an era where the digital realm has become the epicenter of business operations, having a robust online presence is no longer an option but a necessity. For the legal…
January 12, 2024
Read More

Read 10 MIN
Gatsby vs Next.js vs React.js: What to Choose in 2024?
Web development has come a long way in recent years, and with so many frameworks and tools available, it can be difficult to decide which one to choose for a…
January 10, 2024
Read More

Read 14 MIN
Pros and Cons of Custom Software Development
In the fast-paced realm of contemporary business, where innovation is the currency and efficiency is the mantra, Custom Software Development has emerged as a cornerstone for companies striving to stay…

Read 5 MIN
Top 10 Node.js Development Companies California 2024
Welcome to a deep dive into the Node.js landscape in California for 2024. This guide is tailor-made for CEOs, CTOs, hiring managers, project managers, entrepreneurs, and startup founders looking to…
January 8, 2024
Read More

Read 17 MIN
Next JS vs React: Key Differences, Advantages, and Limitations
So you’re an entrepreneur and thinking of creating a landing page, eCommerce website, static website, or want to develop an app. You are confused about which software development platform to…
January 7, 2024
Read More

Read 7 MIN
React Three Fiber vs Three.js: A Comprehensive Guide
When it comes to 3D graphics in web development, React Three Fiber and Three.js are two prominent libraries that developers often consider. Both offer powerful tools to create immersive and…

Read 14 MIN
Laravel vs Node JS: Which is Better in 2024?
Every web developer desires to use a backend technology that can boost the performance of their website and is highly scalable. Who doesn’t want it? When it comes to the…
January 6, 2024
Read More

Read 12 MIN
11 Best NodeJS Frameworks For Web Apps in 2024
As of today, we can see the trend of node.js because the cutting-edge programming advancement industry is profoundly impacted by Node.js systems. This is one such structure that joins a…
January 4, 2024
Read More

Read 22 MIN
Build an App Like TurboTax
In the dynamic landscape of financial management and tax compliance, the need for efficient and user-friendly solutions has never been greater. For visionary leaders and innovators in the United States,…
January 3, 2024
Read More

Read 4 MIN
How to Use Gemini AI in Your Uber Clone App Development?
2023 has been a defining step in the evolution of artificial intelligence and its use in Uber Clone App Development. This blog includes complete information about the role of AI-based models, such…
January 2, 2024
Read More

Read 11 MIN
JMS vs Kafka: Which Message Brokers is better?
In the ever-evolving landscape of modern technology, where efficient communication forms the backbone of success, the choice of a robust message broker becomes paramount. As the leader of any team,…

Read 14 MIN
Django vs NodeJS: Which Is Better in 2024?
In this blog, we will have a detailed comparison between two dynamic technologies Django vs NodeJS used for building versatile websites, Web, and mobile apps with an interactive user interface. In a…
January 1, 2024
Read More

Read 22 MIN
React Trends 2024 – React New Features & Developement Tips 2024
React.Js has been a popular JavaScript library for building user interfaces since its release in 2013. Over the years, it has evolved and grown in popularity among developers due to…

Read 12 MIN
Startup Idea Validation Before Developing (Step-By-Step Guide)
Turning a startup idea into a successful reality requires more than just a brilliant concept. It demands a rigorous validation process to ensure that your idea aligns with market needs…
December 26, 2023
Read More

Read 6 MIN
Magento vs WordPress: Which Should be Used & When?
Gone are those days, when creating a website was considered as an overwhelming process. Today, we are in the technology-mediated era, and for the aforementioned purpose, we employ a content…
December 19, 2023
Read More

Read 11 MIN
Strategies For Choosing Outsourcing Software Development
One strategy that has gained immense popularity is outsourcing software development. Outsourcing allows companies to tap into a global talent pool, reduce costs, and accelerate time-to-market. However, the success of…
December 12, 2023
Read More

Read 8 MIN
GraffersID Awarded as One of the Most Reviewed Vendor in India
GraffersID is a fast-growing company that delivers spectacular IT development solutions to businesses worldwide. We’ve worked with over 100 clients including big players like Sequoia, Coca-Cola, and more. We started…
November 17, 2023
Read More

Read 11 MIN
Best AI Tools for Maintaining Work-Life Balance
Balancing work and personal life has become increasingly challenging in our fast-paced digital age. The constant demands of work, personal commitments, and the omnipresent nature of technology often blur the…
October 27, 2023
Read More

Read 9 MIN
Flutter vs React Native 2024: Perspective Dissection
When developing an app for your business, there’s always this huge dilemma about what platform to choose to drive the best customer engagement. To resolve your confusion we have discussed Flutter…
October 9, 2023
Read More

Read 21 MIN
Best 14 Celebrity Look Alike Generator Apps
While technology has become an integral part of human lives, social media has transformed into a platform of creativity, self-identity establishment or professional interactions. Among the numerous typical posts and…

Read 11 MIN
Top 8 UI Libraries For React Native 2024
Motion graphics and animation have become essential aspects of the mobile development process. From offering a delightful experience to the users to getting in explicit sync with the understanding of…
October 8, 2023
Read More

Read 17 MIN
Create Your Own Learning Management System
Are you looking to embark on the journey of building your very own Learning Management System (LMS)? Whether you represent an educational institution, a corporate organization, or an individual instructor,…
October 5, 2023
Read More

Read 13 MIN
MERN Stack & What is MERN Stack Used For?
Nowadays, there are a host of technologies that are used to create web applications. It can get difficult to decide which technology to use, especially when there are tons of…
October 1, 2023
Read More

Read 7 MIN
India vs USA: A Cost-Benefit Analysis of Outsourcing
In today's globalized business landscape, outsourcing has become a critical strategy for companies aiming to reduce costs and improve efficiency. Two prominent outsourcing destinations, India and the United States, stand…

Read 11 MIN
React Native vs Xamarin vs Ionic vs Flutter: Which is Better in 2024?
So you are confused about choosing the right frameworks i.e. React Native vs Xamarin vs Ionic vs Flutter for the development of your cross-platform app in 2024? Don't worry, GraffersID…
September 29, 2023
Read More

Read 19 MIN
LinkedIn Alternatives for Hiring Remote Developers
In today's ever-evolving job market, the demand for remote developers has surged to unprecedented levels. The traditional methods of recruitment through platforms like LinkedIn are still prevalent, but savvy employers…
September 26, 2023
Read More

Read 10 MIN
React for Enterprise Applications: Why Use React For Large Scale Business
React is an incredibly powerful JavaScript library for developing enterprise applications. It offers developers a range of tools and features that make it perfect for creating large, complex applications that…
September 21, 2023
Read More

Read 10 MIN
Best 8 Free Language Learning Apps & How Does It Work?
Want to learn a new language? We say it’s a great choice. Besides helping you stack up your skills, learning a new language can help you communicate with different country…
September 15, 2023
Read More

Read 12 MIN
Behavior Driven Development: Meaning, Process, and Examples
In simpler terms, BDD (Behavior Driven Development) is a software development process to ease communication and fill the gap between technical people and business people. Supported by Cucumber, the BDD…

Read 12 MIN
How to Choose the Right Software Development Partner
Enterprises, irrespective of their size ( small or large), hire the best software development company to outsource their technological requirements and expect their software development partner to optimize business processes…
September 13, 2023
Read More

Read 12 MIN
Why is a Quality Assurance Tester Needed on a Software Development Team?
In the technology-driven era, users prefer convenience over complexity. That is the fact, and we all are aware of it. When a startup or an entrepreneur creates a MindMap of…
September 12, 2023
Read More

Read 15 MIN
Full-Stack Developer VS Android Developer: What Should You Choose?
So, you are all set with your new project. You have the focus ready and the industry you’ll cater to in a clear picture. Now, it’s time to set your…

Read 7 MIN
Top 12 Candidate Relationship Management Systems For Recuriters
In the ever-evolving landscape of talent acquisition, recruiters face a myriad of challenges. The task of identifying, engaging, and nurturing relationships with potential candidates has become increasingly complex. This is…

Read 9 MIN
How To Create An App Like Waze In 2024
When a smartphone user needs to go somewhere, there is a high chance of using a mobile app to find the best route with the fewest obstructions and the lightest…
September 11, 2023
Read More

Read 7 MIN
What is React JS Used For?
Mobile and web application users are increasing tremendously. Most companies use these robust technologies for developing mobile applications and experiencing a flawless and seamless user experience. React JS is one of…

Read 12 MIN
Top 10 Web3 Platforms to Trust in 2024
The digital world is evolving, and Web3 is at the forefront of this revolution. Web3 platforms are reshaping how we interact with the internet, offering decentralized and secure solutions. In…

Read 9 MIN
What is JavaScript And Why JavaScript Is So Popular In 2024?
JavaScript is an exemplary example of a First-mover advantage, which is especially solid in programming dialects. What's more, add to that, Network impact as by far most of its initial…
September 8, 2023
Read More

Read 19 MIN
Create Streaming App Like Netflix: An Ultimate Guide
Video streaming is mounting as stay-at-home and social distancing are turning people to TV series and movies to ease their isolation and pass their time. A recent report by Conviva,…
September 5, 2023
Read More

Read 13 MIN
Android App Development Companies in New York
With the jump of the smartphone industry, we have seen growth in the development of portable application advancement organizations all over the United States. From building-related applications to games and…
September 4, 2023
Read More

Read 18 MIN
Cost To Hire An App Developer In 2024?
According to research conducted by Statista, global mobile app sales reached 249.9 billion U.S. dollars in 2019-2027 and total revenue is expected to show an annual growth rate (CAGR 2022-2027)…

Read 5 MIN
How to Successfully Invest Your $5M Savings in Your Startup Idea
Congratulations on accumulating $5 million in savings for your startup idea! The journey ahead is both exhilarating and demanding. This comprehensive guide will steer you through the process of wisely…

Read 17 MIN
Hire Remote Developers In Germany: Overview, Cost, & Benefits
There's no doubt that remote work is here to stay. Offering higher flexibility and the needed benefits, remote working has helped several companies grow while cutting down their cost to…
September 3, 2023
Read More

Read 15 MIN
Hire MERN Developers In USA From India
Are you planning a full-stack development process? MERN stack development can offer you an edge over the competition and build attractive websites and applications that not only look good or…
September 2, 2023
Read More

Read 14 MIN
Top Christmas Countdown App in 2024 & How They Works?
Christmas Countdown Apps help the user in counting the days until the Christmas holiday. It is a countdown timer app that provides different types of notifications to remind users about…
September 1, 2023
Read More

Read 32 MIN
Why Good UI UX Matter When Developing a Web App In 2024?
User interface and visitor experience (UI UX) design are crucial in web development since it is one of the first things users see and interact with when they visit a…
August 31, 2023
Read More

Read 7 MIN
Why Outsourcing Software Development to India is a Success?
Have you ever wondered why global giants like Google and Microsoft are led by Indian personalities like Sundar Pichai and Satya Nadela? And, Why Outsourcing Software Development Projects or hiring…
August 30, 2023
Read More

Read 8 MIN
Must-Have Software Developer Skills in 2024
Software development is a trendy career choice in today's era. A vast amount of career switchers aspires to become a software developer. If you are one of them, you should…
August 28, 2023
Read More

Read 7 MIN
Examples of Node.Js Applications and Uses
Node.js is most efficiently used as an open-source cross-platform that runs a JavaScript engine to execute code written in JavaScript outside a web browser. Node.js is a super cool platform…
August 24, 2023
Read More

Read 8 MIN
How To Make An App Like Bumble in 2024?
The world witnessed a pandemic and yes, a lockdown. It took a toll on the economy and personal lives of the people. Every user was online. And, one type of…
August 23, 2023
Read More

Read 11 MIN
Difference Between ReactJS and React Native
ReactJS vs React Native - are the 2 implausibly widespread technologies within the app development business. These tools have similar names: they were launched by Facebook. Since its launch, they…
August 22, 2023
Read More

Read 23 MIN
Advantage & Disadvantage of WordPress Website
Talking about the advantage & disadvantage of WordPress website we should first have a look at what is WordPress website. The WordPress website is an open online website that is…

Read 25 MIN
Hire React.JS Developers From India
So you are looking to hire ReactJS Developers in India? Here is a detailed blog about ReactJS, What is the Wide Range of React JS Services?, the Expertise of Our…

Read 10 MIN
What is WordPress Website Maintenance and Cost?
So you have a built website using WordPress, but you don't know about WordPress maintenance and cost for the same. Then, don't worry we are here to resolve your queries.…
August 20, 2023
Read More

Read 14 MIN
Five Key Principles of UX Design
What is essential for the survival of designers in the ever-evolving scenario of UX and UI? If you take a look at the digital world, everything is transient owing to…
August 18, 2023
Read More

Read 11 MIN
How To Develop An App Like Clubhouse App in 2024?
So, you probably have been hearing about a new social media platform: the clubhouse app, and starting to feel like you are left out of the club. In this blog,…
August 17, 2023
Read More

Read 10 MIN
How to Build a Software Development Team Structure
Assuming that you have an amazing software idea, and you are looking to build an amazing software development team to work on your software project to convert it into reality.…
August 16, 2023
Read More

Read 23 MIN
Node.JS Security Best Practices to Follow
For building backend APIs and web applications, NodeJS has proven to be one of the best frameworks for runtime JavaScript code bases. Since it is asynchronous, developers have the leverage…

Read 26 MIN
Effective Ways to Raise Funding at Various Stages of Startup
Every business startup begins with high hopes and investor confidence. However, there are certain odd circumstances that can either make a business startup or mar its success. According to various…
August 15, 2023
Read More

Read 8 MIN
How Much Does it Cost to Build An MVP 2024 [Comprehensive Guide]
Have an idea that can beat Instagram or create competition for popular dating apps like Tinder and Bumble? Then, why not just try to wait? Now, you might be thinking…
August 12, 2023
Read More

Read 24 MIN
Best 30+ ChatGPT Chrome Extensions in 2024
Have you ever wished you could supercharge your ChatGPT experience and make it even more powerful and versatile? Well, look no further! In this article, we'll delve into the world…
August 11, 2023
Read More

Read 10 MIN
Best Laravel Tools For Software Development 2024
At present, there are 2 billion websites live on the web, and the count is rising consistently. As of late, web systems have been moving, and there are a large…
August 10, 2023
Read More

Read 15 MIN
What is the Software Development Life Cycle (SDLC)?
The software development life cycle is an organized interaction that lies at the center of each software development. Somebody distinguishes an issue, talks about it with a gathering of similar…
August 8, 2023
Read More

Read 14 MIN
Top 11 PHP Development Companies In USA
PHP is a popular language and is generally preferred for web development. However, developing a PHP web application without the help of a PHP web development company can be difficult…

Read 13 MIN
The Future Of MERN Stack Development
If you are not new to the development world, we bet you must have heard about MERN stack development. With the technological advancements in the world, it's pretty natural to…

Read 17 MIN
Average Mobile App Development Cost in 2024 [ Breakdown ]
Planning to build an app but unaware of the exact cost of developing the app? Well, determining the exact app development cost is undoubtedly a complicated process. So to help…
August 7, 2023
Read More

Read 8 MIN
Advantages of MERN Stack Development
The rapid growth of the digital marketing sector has raised consumer expectations. Developers toil nonstop day and night to create a website with a better user experience, a faster download…

Read 9 MIN
Top Mobile App Development Companies California, USA
In today's fast-paced digital landscape, mobile applications have become an integral part of businesses across the globe. From enhancing user experiences to streamlining operations, mobile apps offer a plethora of…

Read 10 MIN
What is Artificial Intelligence? Types, Goals and Applications
Artificial intelligence is gripping the world in its arms becoming an important of technology nowadays. And it is also named Machine intelligence. What is Artificial intelligence? Artificial Intelligence (AI) is…

Read 10 MIN
Hire Remote Developers in USA
There's no denying that remote work is here to stay, especially after the overnight outbreak of Covid-19 sent everyone back to their spaces. With higher flexibility and better peace of…
August 6, 2023
Read More

Read 17 MIN
Best Food Delivery Apps In USA And How Does They Work?
It’s true that the IT industry dramatically grew a millionfold during the pandemic, but so did the food industry. So, whether you are confined in your spaces while an airborne…
August 5, 2023
Read More

Read 17 MIN
Benefits of Hiring Dedicated Developers From India [Key Points]
It is always easier, quicker, and more effective when specific tasks are given to specific individuals or teams of individuals who have some ideas and expertise in the field. On…

Read 17 MIN
Relational vs Non-Relational Database: Key Differences
In the ever changing landscape for data organization, a decision between a relational and non-relational databases must be made for the organization and the choice made has a huge bearing…
August 3, 2023
Read More

Read 11 MIN
How to Grow IT Company Fast and Effective In 2024
An IT company's growth can be accelerated with start-up entrepreneurs' advice; however, there is no definite recipe for overnight success. Read along to know the simple ways for how to…

Read 27 MIN
How to Hire Developers For a Startup in 2024
In today’s scenario, we all agree that startups have transformed into an overall pattern of re-appropriating and building groups abroad. Every year, there is an ever-increasing number of firms arising…

Read 10 MIN
Find & Hire the Best SaaS Software Developers
n the fast-paced realm of Software as a Service (SaaS) companies, where innovation is the driving force and technology evolve at breakneck speed, the role of a skilled developer is…
August 2, 2023
Read More

Read 15 MIN
Top 11 Mobile App Development Companies Australia
The insane popularity of mobile app development Has resulted in a spike in the demand for mobile app development companies In the world, especially in countries like Australia. Have you…

Read 16 MIN
How To Develop The Best Doctor Appointment Booking App in 2024?
Do you face any difficulties in managing patient appointments at your clinic? Do your employees take much time to schedule appointments and rationalize clinical operations? In that condition, creating a…
August 1, 2023
Read More

Read 10 MIN
Difference Between UI and UX Design [Detailed Comparison]
User Experience and User Interface are two terms that are often used interchangeably but mean very different things. So, what is exactly the difference between UI and UX? Walking down…

Read 8 MIN
Hiring Freelancers? Toptal Vs Upwork Vs GraffersID – Which is the Better Choice?
In today's fast-paced and ever-changing business landscape, hiring freelancers has become a popular and practical approach for organizations seeking specialized skills, cost-effectiveness, and flexibility. With the rise of remote work…

Read 11 MIN
Best Frontend Frameworks For Web Development 2024
Customer experience is the most significant requirement for every business cultivating a site. Regardless of how complex tasks and capacities happen behind the scenes, the client's views and experiences must…

Read 9 MIN
3 Marketing Strategies to Boost Your Conversion Rate
"Client Conversion Marketing Strategies 2024" In electronic commerce, Conversion Marketing is marketing with the intention of increasing conversions--that is, site visitors who are paying customers. The process of improving the conversion rate is called conversion rate optimization. There’s…
July 31, 2023
Read More

Read 9 MIN
How To Create Your Own Dating App
Nowadays, the excursion to discover love can be a significant battle. With dating apps, a ton of swiping, following, informing, and dissatisfaction happens before you choose whether somebody is deserving…
July 23, 2023
Read More

Read 13 MIN
How to Find and Hire Dedicated Remote Development Team?
Finding and hire remote development team is a highly daunting task and it has become more challenging with the spread of the Coronavirus. Countries like China and Italy, which are…
July 21, 2023
Read More

Read 9 MIN
How to Pick the Best Web Design Agency for Your Business Goals
One of the toughest experiences for a beginner in internet marketing is launching a new website. Because of this, choosing a web design company to advertise your brand requires careful…

Read 9 MIN
Eight Most Costly Mistakes in Software Development Outsourcing
There are a ton of upsides without a doubt. Not only does re-appropriating empower them to accept troublesome advances yet additionally assists them with guaranteeing business progression regardless of any…
July 15, 2023
Read More

Read 10 MIN
How to Setup the Offshore Development Team in India?
Set Up an Offshore Team in India has become the most popular way of outsourcing software development. Offshore development means having a dedicated in-house team at a cost that favors…
July 7, 2023
Read More

Read 9 MIN
Best CRM’s For Fintech Websites
In today's competitive landscape, customer relationship management (CRM) tools have become indispensable for businesses across various industries, and the fintech sector is no exception. Fintech companies, with their focus on…
July 6, 2023
Read More

Read 13 MIN
Top Fintech App Development Companies 2024
What is Fintech and How Can Fintech App Development Companies Help? Fintech is the term used to refer to financial technology. It is an umbrella term that encompasses a wide…
July 5, 2023
Read More

Read 10 MIN
Top Ecommerce Development Companies 2024
The growth of e-commerce has transformed the way businesses operate, making it essential for companies to establish a strong online presence. In today's competitive landscape, having a well-designed and functional…
June 26, 2023
Read More

Read 18 MIN
5 Advantages and Challenges of Hiring Remote Developers
The increasing cases of Coronavirus in every country have made governments worldwide shut down cities and towns. IT organizations are preparing more of their workforce to work from home as…
June 21, 2023
Read More

Read 11 MIN
Top 12 ReactJS Development Company In USA
So you want to develop software using ReactJS. And you are eagerly looking for the top ReactJS Development Companies. Don't worry your waiting is over, Here we have listed our…
June 19, 2023
Read More

Read 11 MIN
Top 15 Mobile App Development Companies In The USA
If you are looking for the right development partner for your software project, then you have landed at the right place. Here we have created a list of Top App…

Read 12 MIN
Svelte vs React: What to Choose in 2024?
When it comes to developing JavaScript applications, choosing the right framework is crucial. In today's competitive landscape, two popular frameworks, Svelte vs React, have emerged as powerful contenders. Svelte, known…
June 16, 2023
Read More

Read 8 MIN
Top 15 Healthcare Software Development Companies USA
Everyone is more interested in their health and well-being these days. The connection between doctors and patients will be made more accessible through healthcare applications. The availability of neighboring pharmacies…
June 15, 2023
Read More

Read 10 MIN
TypeScript Vs JavaScript: What Are The Differences?
If you are a developer working on several development projects, it’s imperative to understand the difference between Typescript vs Javascript. One of the most popular languages in the development world,…

Read 9 MIN
Mendix vs Outsystems: The Comprehensive Guide 2024
Low-code platforms simplify the process of building a business app, which helps to save time. Low-code platforms offer a safe space for both unskilled developers and industry professionals to create…
June 9, 2023
Read More

Read 6 MIN
Hire Remote Developers in Singapore
In recent years, the global workforce has undergone a significant transformation, driven by advancements in technology and changing attitudes toward work. One of the most notable shifts has been the…

Read 10 MIN
Real Estate Website Development ( Step-by-Step Guide )
The real estate industry is one of the most dynamic and in-demand business niches in the market. According to Grand View Research, the real estate market is expected to grow…
June 8, 2023
Read More

Read 5 MIN
Top 10 Trusted Node.JS Development Companies in 2024
In today's rapidly evolving digital landscape, Node.js has emerged as a powerful and versatile technology for developing scalable and high-performance web applications. With its event-driven, non-blocking I/O model, Node.js has…
June 6, 2023
Read More

Read 12 MIN
How To Build A Stock Trading App like [ Robinhood, Cash App, eToro, Trade Republic ]
So you want to Build a Stock Trading App and want to know how you can proceed with App Development. Then you have landed at the right place. Here we…
June 5, 2023
Read More

Read 11 MIN
How To Build A Beauty Store App Like Nykaa?
Since its inception in 2012, Nykaa has been one of the most famous billion-dollar concepts in the health, fashion, and makeup industry. Currently, the company raised revenue of more than…
June 3, 2023
Read More

Read 11 MIN
PHP vs Python: Which Language to Choose for Server Side Development?
Python vs PHP, both are widely used high-level programming languages. PHP is an open-source server-side scripting language, while Python is known for its dynamics, simplicity, and availability. Despite being equally…
June 2, 2023
Read More

Read 8 MIN
Flutter vs Kotlin: Which to Choose in 2024?
Apps have become an inevitable part of our daily lives. And, the app makers if succeeded to gather the mobile user's attention then the developers would be busy filling their…

Read 10 MIN
Best Low-Code Platforms To Use in 2024: Benefits, Availability & Challenges
A low-code development platform is software that automates the process of creating applications. It provides a drag-and-drop environment to create applications without the need to write code. A developmental platform…
June 1, 2023
Read More

Read 5 MIN
Maisie Williams Startup Daisie Raises $2.5m Seed Funding
The end of the watch in GOT has made a tickling start for Arya Stark`s startup. Maisie Williams aka Arya Stark from Game of Thrones has found success again with her app…
May 24, 2023
Read More

Read 8 MIN
MEAN Stack vs MERN Stack: Which is Better Technology Stack in 2024?
Full stack development plays a crucial role in web development as it’s used in front-end, back-end, application testing, and software development. When it comes to full-stack development, startups get confused…
May 20, 2023
Read More

Read 8 MIN
The Importance of Effective Server Management
It’s no wonder, that every business today, whether large or small needs technological tools and applications to flourish and sustain itself. For software development, they are connecting and working with…

Read 6 MIN
The Future of Offshore Software Development: Trends and Predictions
Offshore software development has been on the rise for decades, as companies seek to leverage the advantages of cost savings, access to global talent, and the ability to scale their…
May 16, 2023
Read More

Read 5 MIN
How to Hire Remote Developers in Poland
Hiring remote developers from Poland can be an excellent option for companies looking to expand their teams without breaking the bank. Not only is Poland home to a highly skilled…
May 15, 2023
Read More

Read 18 MIN
WordPress Developer – How and cost to hire an expert?
The digital universe is brimming with new tools and technologies and every business whether it is a startup or an established one prefers to develop websites to ground their clients…
May 13, 2023
Read More

Read 11 MIN
Webflow vs WordPress: Detailed Comparison 2024?
In this blog, we have discussed in detail about Webflow vs WordPress comparison. GraffersID team has tried to cover every minute detail, such as how easy to use these platforms,…

Read 4 MIN
Google Search Console: How to Use it for Your SEO Strategy
Many people neglect to use Google Search Console (GSC), claiming nothing great comes for free. Yet, this tool offers a broad functionality that can compete with many paid alternatives. Whether…
May 10, 2023
Read More

Read 12 MIN
.NET Core VS Node.JS: The Ultimate Guide in 2024
Do you have a software design in mind? If yes, we bet the most important concern would be choosing the right programming language. When it comes to the trendiest programming…
May 8, 2023
Read More

Read 12 MIN
Outsourcing to India: Ultimate Guide For 2024
Outsourcing has become a popular practice for businesses worldwide, as it enables them to reduce costs, access specialized skills, and increase efficiency. India has emerged as one of the leading…
May 2, 2023
Read More

Read 13 MIN
Flutter vs Swift: Which is Better in 2024 for iOS App Development?
It would not be wrong to say that Flutter is the rising star in the world of iOS app development. With the massively growing popularity of Flutter, the battle of…
May 1, 2023
Read More

Read 11 MIN
Scope Of On-Demand Service Apps and Its Market Trends in 2024
Are you often busy and don’t find time to complete your chores? If yes, then you are not alone, and this happens to all of us as we live in…

Mistakes and Solutions: 5 Lessons From 10 Failed Unicorn Startups
The startup success rate is less than 10% this is probably the one stat that every Entrepreneur knows. However, most of entrepreneurs think that once a startup raises funding things…
April 27, 2023
Read More

Read 15 MIN
Python vs Java: Which is Better for App Development in 2024?
In an era where every service comes with a need for app development, it’s pretty hard to select the right programming language for your needs. In fact, tech giants like…
April 26, 2023
Read More

Read 13 MIN
Deno vs Node: Which Perform Better in 2024?
JavaScript is among the most widely used data processing language which is supported by all operating systems. The JavaScript language has undergone constant development due to the large number of…
April 22, 2023
Read More

Read 8 MIN
Top 10 Offshore Development Centers in 2024
Offshore Development Centers (ODCs) have been gaining significant traction over the years as a viable option for businesses looking to outsource their software development needs. With the increasing demand for…
April 19, 2023
Read More

Read 11 MIN
Node.JS Vs Java: What Should You Choose in 2024?
Nowadays, we often see people comparing multiple technologies over the internet just like Node JS Vs Java, whether it's hardware or software. But why do we need to compare? Why…
April 18, 2023
Read More

Read 4 MIN
Ultimate Guide To Optimize Your React Native App Performance
React Native has become the go-to solution for building mobile applications because it allows developers to create apps that work across different platforms, while also offering high performance and a…

Read 9 MIN
Build App Like Urban Clap: Features & Cost in 2024
The on-demand service app like UrbanClap came and conquered the service application ecosystem by filling the gaps and delivering the best in highly competitive markets. Read along with the article…

Read 17 MIN
The Best Tech Stack for Exceptional Mobile App Development
Bringing an idea to execution, engaging target users, and driving profit. Isn’t the app in development is more than a tough task? Developers strive to develop challenging applications that can…
April 10, 2023
Read More

Read 15 MIN
5 Best Project Management Tools for Remote Team Amid Corona
Over the past few years, there has been consistent growth in virtual and remote working teams. Project delivery is no longer restricted to any specific physical location for the workforce…
April 5, 2023
Read More

Read 19 MIN
Best Tools for Seamless Communication with Remote Team
Myriad companies around the world have gone remote due to the COVID-19 outbreak. But, what if your team is working remotely, how would you communicate with them? How do you…
April 3, 2023
Read More

Read 26 MIN
6 Must Have Tools to Manage Remote Teams In 2024
Remote working has been on trend for now and companies all over the globe are adopting it to provide more flexibility to their staff. More so, the outbreak of Coronavirus…

Read 12 MIN
Kodular vs Flutter: What to Choose to Develop a Mobile Application?
Going mobile-first is the need of the hour for every business - beyond doubt. To become future-proof and expand their reach to customers when and where they are, businesses need…
April 2, 2023
Read More

Read 13 MIN
Is NodeJS Used for Frontend or Backend?
Are you confused about whether Node.js is frontend or backend? Don’t worry we have industry experts with years of experience who can help you resolve your queries. Do check the…
March 27, 2023
Read More

Read 12 MIN
Top 11 Swedish Startups to Watch in 2024
There is an entire universe of new businesses/startups. Individuals do like new businesses since they need to work for themselves. Individuals like to be little kings, not major laborers. The…
March 24, 2023
Read More

Read 9 MIN
What is Laravel used for?
With the evolution of technology, it has become easy to develop websites and web applications. There is an abundance of technologies such as Laravel, PHP, and others available to ease…
March 22, 2023
Read More

Read 6 MIN
Top 5 Platform for iOS And Android App Development Platform in 2024
Apps have revolutionized the way people work in this digital era. Every business, whether big or small represents its services with high-end applications that are not only user-friendly but are…

Read 10 MIN
How To Reduce Custom MVP Software Development Cost
According to the stats, 90 percent of people prefer to use the mobile app over a website. Considering these stats, entrepreneurs are coming up with unique software development ideas (…
March 21, 2023
Read More

Read 9 MIN
Ruby vs Python: What to Choose Between Ruby And Python in 2024?
Programming languages are the backbone of software development, and choosing the right one for your project can be a daunting task. Two languages that have gained a significant following over…
March 16, 2023
Read More

Read 12 MIN
Benefits Of MVP Development Approach In Product Development
In today's fast-paced world of product development, it's essential to have a solid development approach in place that allows you to quickly and efficiently bring your ideas to market. One…
March 14, 2023
Read More

Read 12 MIN
Advantages and Disadvantages of Node.JS in 2024
There is no doubt that JavaScript, specifically Nodejs, is one of the widely used client-side programming languages by developers. JavaScript is employed as front-end development and proves to be quite…
March 11, 2023
Read More

Read 11 MIN
React Native vs Swift: Comparison For Mobile App Development
In the rapidly evolving world of mobile app development, choosing the right technology stack is crucial for success. React Native and Swift are two popular frameworks used to build mobile…
March 9, 2023
Read More

Read 6 MIN
What is Ionic? Pros and Cons of Ionic Framework 2024
Are you planning to build a mobile app for multiple platforms? React Native, Native Scripts, Xamarin, or Flutter, are a few common app development frameworks that come to your mind.…
February 22, 2023
Read More

Read 15 MIN
Angular vs React vs Vue: Which is best in 2024
JavaScript frameworks are increasingly becoming popular among web developers due to their versatility and ease of use. These frameworks allow developers to create powerful web applications with minimal effort. In…
February 20, 2023
Read More

Read 5 MIN
Node JS vs Angular: A Detailed Comparison [2024]
Over the past few years, JavaScript has made its headway from being simply a client-side scripting language to emerging as a powerful programming language. In this blog, we will be…
February 13, 2023
Read More

Read 5 MIN
Node js vs Python: Which is Best for Your Project in 2024?
Every project has different requirements and demands. And, when you are building an application, it is important to choose the technology which is most appropriate for your project. In this…

Read 8 MIN
What Made ChatGPT Successful in AI industry?
ChatGPT, the language model developed by OpenAI, has taken the AI industry by storm with its impressive natural language processing capabilities. Chatbots have gained widespread adoption in various industries, powering…
February 6, 2023
Read More

Read 14 MIN
IT Outsourcing Trends to Watch in 2024: How to Stay Ahead of the Game
IT Outsourcing is a business model in which a company outsources some or all of its IT functions to an external provider. This allows companies to focus on their core…
January 19, 2023
Read More

Read 7 MIN
Megatrends in Logistics Technology in 2024 and Beyond!
When we think of the supply chain, the first thing that comes to our mind is- “Logistics Technology 2024”. The only reason is that logistics technology has automated everything. It…
January 10, 2023
Read More

Read 8 MIN
The Outsourcing Revolution: How It Can Transform Your Company in 2024
Outsourcing is a business practice that has gained popularity in recent years, as more and more companies look for ways to increase efficiency and reduce costs. At its most basic,…
January 9, 2023
Read More

Read 7 MIN
7 Technologies Trends That Will Bloom In 2024
Isn’t it fascinating how technology is influencing the various sectors of the market? Ever since the advent of digitalization, the fundamentals of industries began to change for the better. One…
January 5, 2023
Read More

Read 10 MIN
How to Start a Business in 2024 [Step by Step Guide]
With the start of the new year 2023, many young and passionate entrepreneurs have a dream to quit their jobs and start a business?. In spite of blindly following your…
January 3, 2023
Read More

Read 12 MIN
Hire Remote Developers In Finland On a Contracted Basis
Why Finland? Finland is a Nordic country in Northern Europe. It has a population of about 5.5 million people and it is the eighth most populous country in the European…

Read 7 MIN
Costs to Build an Ed-Tech App in 2024 & How Educational App Works?
In the past few years, many schools have been using educational technology to help their students learn. The use of these technologies has grown exponentially in recent years and is…
December 9, 2022
Read More

Read 5 MIN
How Outsourcing Can Help To Streamline Your IT Department
Businesses have different needs when it comes to their IT department. For some, it might be necessary to outsource certain aspects in order to streamline operations and save money. For…
December 1, 2022
Read More

Read 13 MIN
How To Create A Crypto Wallet? [Step-by-Step Guide]
The crypto market is flourishing. With increased awareness and a shift to the digital currency realm, there’s no denying that crypto traders can easily make a living by trading their…
November 29, 2022
Read More

Read 9 MIN
The 12 Biggest Cybersecurity Threats for 2024 And How to Protect Yourself
What are Cybersecurity Threats? Cybersecurity threats continue to be a major concern for those who use the internet or rely on information systems for their business in 2023. This is…
November 18, 2022
Read More
Read 7 MIN
Hire Remote Developers in Canada: Skills, Costs And Demand
Remote development is being used extensively by several organizations these days. It allows for more significant work freedom for remote developers, facilitating quicker delivery of practical solutions. Even if hiring…
September 14, 2022
Read More

Read 5 MIN
React.JS VS Vue.JS: Which One to Choose In 2024?
The development industry has progressed to a new phase where traditional websites and applications have become outdated. Even the world’s most visited website, Google, undergoes regular transformations, modifications, and additions…
August 23, 2022
Read More

Read 17 MIN
Entrepreneurship Myths Business Owners Must Avoid In 2024
Thinking of starting your own business? Being a budding entrepreneur isn’t easy. And what complicated the matter is several misunderstandings and myths associated with running a successful enterprise. It’s true…
August 22, 2022
Read More

Read 5 MIN
Differences Between Product Design and UX Design
The two most confusing jobs in this preset era are that of a product designer and a UX designer. It is not easy to understand the difference because of the…

Read 8 MIN
MERN Stack Developer : How to Hire An Expert?
Are planning for web app development using MERN stack technologies? Hiring a MERN stack developer can be a game changer for your business. We know you need expert and skilled…
July 15, 2022
Read More

Read 12 MIN
Staff Augmentation vs Managed Services: Key Comparison
In staff augmentation, IT projects are outsourced, and you get more authority over the model and can decide what to do and how to do it. While under managed services,…
June 8, 2022
Read More

Read 2 MIN
iTRate listed GraffersID among Top 10 AngularJS Development Companies in India / USA
We’re super delighted to announce that GraffersID has been listed in the Top 10 AngularJS Development Companies in India and USA, in the recent report published by iTRate. GraffersID is…
April 6, 2022
Read More

Read 4 MIN
How to Fix “Your PHP Installation Appears to Be Missing the MySQL Extension Which Is Required by WordPress” Error
WordPress is the most famous Content management system in the current scenario. It is easy to understand stage, therefore its has portion of advantages and disadvantages. There is a touch…
March 29, 2022
Read More

Read 16 MIN
How To Develop The Best Flower Delivery App Like Proflowers
These days everything from flowers to shoes can be delivered on-demand at your location through a single app, just by a single touch of the mobile app. You must be…
March 14, 2022
Read More

Read 9 MIN
NextJS: A Detailed Guide ( What, When, Why)
NextJS is also referred to as the "meta-framework" and it’s a framework that is built on React. It was built by Zeit and is a popular tool, often used for…
March 9, 2022
Read More

Read 8 MIN
How To Hire A PHP Web Developer For Your Next Project in 2024
So, you want to develop software using PHP programming, and now you are looking to hire an expert PHP developer. But you don't have any idea about how to hire…
March 2, 2022
Read More

Read 4 MIN
Simple Ways To Protect Online Business Transactions
Online transactions revved up after the Coronavirus pandemic. As per Statista’s Digital Payment Report, the online transaction value will be over $2,098,515 million by 2025. But, this has created equal…
November 26, 2021
Read More

Read 9 MIN
App vs Website: Which Is Better in 2024? [Detailed Comparison]
Several startups and enterprises ( big and small) are hiring dedicated remote developers or software development companies to develop their business software ( websites and versatile Apps ). However, several…
September 27, 2021
Read More

Read 3 MIN
Sweden Became The Silicon Valley Of Europe
As Klarna's businessman author Sebastian Siemiatkowski gets able to organize one of the best ever European fintech organization postings, a gala of personal enterprise, he credits an associate degree, not…
September 14, 2021
Read More

Read 6 MIN
Best Mobile App Developers In New York
As an entrepreneur, you always focus on creating an impact in the Industry. To achieve goals, you are taking every possible action to take your company to the next level.…
August 17, 2021
Read More

Read 6 MIN
How to Develop a HIPAA Compliant m-Health App?
Have you dealt with the healthcare industry? Well, surely you might have and would have also heard about HIPAA compliance. If not, let’s understand what does HIPAA means before, we…
March 15, 2021
Read More
Read 7 MIN
5 Actionable Steps to Develop a Successful Software Startup from Scratch
Entrepreneurs allured with the vision of creating a lucrative and successful business. They seek out unique and powerful business models, strategies to mark their footprints in the software landscape. Every…
February 24, 2021
Read More

Read 12 MIN
12 Key Considerations Before Setting Up an E-commerce Business
Are you planning to start an Online Business? If yes, then you must read this blog till the end to know everything before setting up an e-commerce business. E-commerce companies…
February 5, 2021
Read More

Read 5 MIN
How To Create A Video-Conferencing App Like Zoom?
Let’s first understand the need that led to the emergence of Video-conference apps? The residents of this planet are confined to their homes, trying to save themselves from the wrath…
January 12, 2021
Read More

Read 5 MIN
5 Best Tools to Manage Remote Team Amid Corona Times
This month has been a heck of a year. The outbreak of Coronavirus has thrust most of the world into a state of panic and most employees (not just the…
April 7, 2020
Read More

Read 7 MIN
Hire Temporary Remote Developers In 2024 From GraffersID
On Wednesday, 11th March 2020, The World Health Organization declared the rapidly spreading coronavirus outbreak, a pandemic. WHO acknowledged that the virus is likely to spread in all countries around…
March 13, 2020
Read More

Read 7 MIN
2023 Next Innovation in E-Commerce Industry
To understand the next innovation we have to first understand the E-commerce industry. It’s pain points, the reason and then the solutions (innovations). The E-commerce industry is one of the…
February 5, 2019
Read More

Read 5 MIN
5 Most Vital mistakes the First-Time Entrepreneurs commit !
The startup success rate is claimed to be at less than 10% which is fairly low. For any business to run successfully the first priority is MONEY. If you have…
August 13, 2018
Read More

Read 3 MIN
Graffersid Founder wins “50 Most Influential Global Youth Marketing Leader” !!
"50 Most Influential Global Youth Marketing Leader" Each year, World HRD Congress awards companies and individuals over multiple categories and domains for their outstanding work over the year. The recognition is not…
March 19, 2018
Read More
Read 3 MIN
Getting Started with React.js: An Introduction for Beginners
Are you a web developer looking to take your skills to the next level? Or perhaps you're just starting your journey into the world of web development? Either way, React.js…
January 1, 1970
Read More
Latest Post
Hire Dedicated Remote Developers from GraffersID
Onboard dedicated remote developers to your project as quickly as in 2 days. If at any point in time, you feel the developer is not performing as per expectation, you can ask for replacement or end the contract with 0 penalties.
Book ConsultationGet Your Free eBook!
Are you ready to dive into a world of tech insights, tips, and inspiration? Grab your copy of our exclusive eBooks – available for free download
Download nowSubscribe to our Newsletter
Subscribe


